Quite often, the question “How do I henna my eyebrows?” arises. As a matter of fact, hennaing eyebrows is quite easy. Following is a very easy recipe on how to henna your eyebrows. Hennaing eyebrows takes some dedication, as eyebrows have a rapid growth/shed cycle. The frequency of applications vary from once every two weeks to once a month. First time hennaed brows can appear orange, however a repeat application can be done to deepen the colour if needed. It is best to henna when one doesn’t need to go out for a couple of days. Do not use harsh cleansers on your brows for 3 days after hennaing and protect and moisturize them with Henna After Care Balm, or shea butter.
What do I Need?
- 2 pieces of kitchen wrap 3″x1.5″
- Shea butter or Sweet Mimosa butter to adhere the kitchen wrap to your face.
- Henna of your choice (50/50 Fresh Moroccan Henna and Organic Amla Powder– Vanessa’s choice, great for cooler toned muted henna). Approximately 1 TBS of henna powder mixed with warm water should be sufficient. Indigo/Katam hair Dye and/or Organic Cassia Obovata Powder can be used to match henna glossed or henndigoed hair.
- Q-Tip or old mascara brush to apply henna.
*Henna Powder, Indigo, Katam and Cassia are all available at Henna Sooq.
Step 1: Prepare The Henna Paste
Since this henna paste is going to be used near the eye, it is recommended to keep the mixture on the thicker side to avoid drips. Use a little water and stir the paste until all the lumps have been smoothed out. If Organic Amla Powder is to be used, mix it in with the henna powder prior to adding the water. Allow the henna to release for the specified time for the henna chosen. If using Organic Cassia Obovata Powder, add it to the henna before dye release. Indigo Powder can be mixed and added to the henna paste to produce browns and burgundies. If you’ve just hennaed your hair and have left overs, proceed with the next step.
Step2: Prepare Your Brows for Hennaing
Wash your brows with a little clear face wash, clear shampoo, or wipe them well with alcohol wipes or witch hazel and allow them to dry. Apply Sweet Mimosa Butter, or shea butter around the brow area, approximately a half-inch strip around the brows, making sure to avoid the brows.
Step 3: Applying Henna Paste To Brows
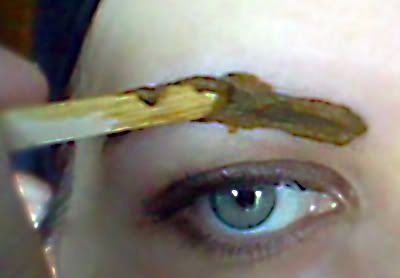
While looking in the mirror, start off by applying henna to the brows with a q tip in the direction of the brows growth. Use tiny circular motions to spread the henna to the base of the eyebrow hairs. Repeat the process until there is a nice thick coat of henna, henndigo or henna gloss on the brows.

Step 4: Covering Hennaed Brows
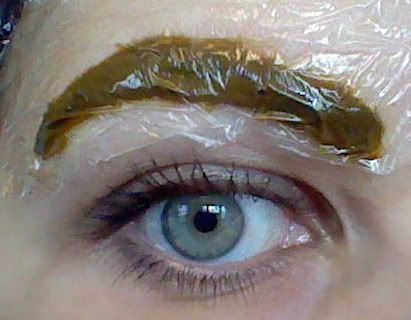
Take a piece of kitchen wrap and gently place over the hennaed brow. Smooth the plastic around your brow to make sure it is ‘adhered’ to the skin, then gently press on the brow to remove any air bubbles around the henna. Repeat with the other brow.

Step 5 The Waiting Game.
Hennaing Brows and Timing. If you already henna your hair, use the same times on the brows. Some find that 2 hours is sufficient, while others need 4 hours. For those that henna overnight, it is best to do several shorter sessions until the colour builds up to how you want it.
Step 6: Removing Henna Paste.
To Remove the henna paste, simply peel off the kitchen wrap and wash brows with warm water. Pat dry and apply shea butter, Sweet Mimosa Butter or Henna After Care Balm to the brows before getting the brows wet.
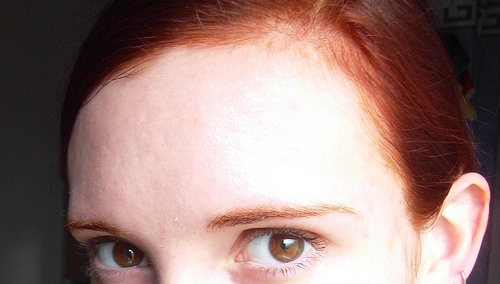
Yemeni on Brows, Courtesy of ‘Rach’ from LHC


Great article and very well explained 🙂
I was contemplating on dying my eyebrows because my brows are significantly darker than my henna’d hair.
You gave the confidence now to dye my eyebrows thank you!❤
Thank you very much, Lindsy. 🙂 That’s fantastic! Enjoy! 🙂
Is it Yemeni on her hair too? Or just her brows? I’m trying to decide between Jamila or Yemeni
I had a lady ask me the other day if it’s possible to hennae the eyebrow area, note that she barely has hairs there…so it would dye her skin, is that possible…would henna stain face skin?
Hi there Cynthia!
Yes, Rach exclusively uses Yemeni on her hair. It’s beautiful. isn’t it?! 🙂
It’s gorgeous. What’s her natural color?
My natural colour is medium brown 🙂
http://farm3.staticflickr.com/2683/4387314443_e0a479fb93_o.jpg
Thanks for stopping by, Rach! 🙂
Thanks so much for this tutorial! I’ve been wanting to henna my eyebrows for awhile.
Why do you need to put shea butter on eyebrows before getting wet? Do you mean you have to put butter (or vaseline maybe?) on your brows every time you wash your face or take a shower?Does the color start to come out if you get your brows wet? Is that because this brow formula uses water as the liquid? I would like to henna my brows but I want to still be able to go swimming when I want so what if I were to use lemon juice or vinegar like I do when I henna my hair? Wouldn’t that give my brows more permanent color? Any feedback would be appreciated.
Hi Eileen.
The shea butter is to protect the hennaed eyebrows for the first 4 days after hennaing (during oxidisation) as most face cleansers can fade the result too fast. Plus the facial area is washed more often than the hair, which causes faster fading.
Also, we don’t recommend adding straight lemon juice to henna, especially if the henna is going near the eye area. The use or lemon juice in henna doesn’t impact on the colour outcome or permanency of henna at all.
There is no such thing as permanent colour on the brows as the brow’s hair has s short terminal length (way shorter than the hairs on our heads) and will shed every 6-8 weeks (as not all the hair sheds out at the same time, there will always be a few hairs shedding at the same time and new ones growing it their place), hence the reason for frequent re-applications and protecting the brows.
how come the henna doesn’t stain the skin around your eyebrows? is it the shea butter?
RIley, yes it won’t stain the skin around your eyebrows because the shea butter and any butters will protect the skin from the dye.
I will try this!
Can henna cover the grey hairs of your eyebrows?
Good morning Ann. Yes absolutely!
Regarding the possibility of the henna staining the skin: can you use vaseline or some other fat cream instead of the shea butter?
I have allergies and react easily to certain products, so I’m anxious to know if the (very fat) creams I usually use will work just as well (they somewhat resemble vaseline in their compositions)?
Hi Camilla. Yes absolutely. You can use our Sweet Mimosa Butter as it’s natural and handmade by us: http://www.hennasooq.com/sweet-mimosa-butter/
You’ll love it !! 🙂 But don’t use vaseline as that’s petroleum. If you can’t order our butter use shea butter or cocoa butter.
Hi, I don’t really have eyebrows any longer. They fell out except for the ones closest to my nose. I would like to know if I can use henna to “make eyebrows” instead of using an eyebrow pencil all the time. I hate it when they wear out in spots and smudge if I bump them with my hands when pushing my glasses up.
Hello Linda. No unfortunately henna doesn’t stain the facial skin well including the eyebrow area. You could try to promote some growth of your eyebrows with our Organic Camellia oil. This works well on eyelashes and eyebrows: https://hennablogspot.com/get-long-luscious-eyelashes-naturally-with-camellia-oil/
Thank you for your help Khadija. You always have the best knowledge and advice for me 🙂 I have the camillia oil from you and will start to use it on my eyebrows now. Thank you again 🙂
Why do you need the cling film…is it not good to have the henna dry on your brows/skim?
Hi Mary. The cling keeps in moisture and keeps the coloring dyeing really well and deeply. This way it also lasts longer. I hope this helps.
Hello and thank you for the article. I have a question, though. I reached this article via the article about the dangers of synthetic dyes (sent to me in an email newsletter). The picture of the model having her eyebrows hennaed also showed her eyelashes being done, I believe. Is this correct? Can you henna eyelashes? If so, can you briefly describe the process?
Thanks so much. 🙂
Deb, thank you for your post. The eyelashes are very close to the eyelids. We can’t say that we would recommend coloring your eyelashes with henna, sorry. You can more then likely color false eyelashes before you put them onto your own eyelids.
Thank you, Khadija.
So how many bags to i have to purchase? I dont understand
If i have dark hair do i use a different color than if i had blonde hair?
How many applicationd can i get with a 100grams bag?
Hi Atenea. How much you’ll get from 100g depends on your hair length and thickness. Can you let me know what that is? Typically you don’t have to use different henna based on your hair color but it really depends on what color results you’d like. When getting 100g are you only using it on your eyebrows or your hair as well?
I want to get it to dye my eye brows, so with one bag of 100gr how many applications can I get?
also if I have dark hair do I just use henna or do I have to mix it with the indigo color?
You can use either henna alone for a tint of red or add indigo to bring it more towards a brown tone. Whichever is fine depending on which outcome you’d like. With 100g you should get at least 4-6 applications.
We sell henna and organically certified products at http://www.HennaSooq.com. This is our blog associated with our business.
We sell an organically certified amla powder that when used with henna can reduce some of the red of henna, but alone no it won’t color brownish or black tones. We have it available for clients here: http://www.hennasooq.com/organic-amla-powder/
Since Lush isn’t exactly natural or works best to color your hair, we recommend a more natural product line with organic henna and hair color including essential oils rather then artificial fragrances: http://www.hennasooq.com
Hi Khadija,
Lush isn’t natural?!
Thank you for your info. I will look into your company.
Hello. Not exactly. If you review their ingredients some of them have SLS and fragrances in them which are artificial. I hope this helps.
Its just powdered herb no other ingredients.
how does your done eyebrow looks normal when the application of henna is i think too much ?
Sorry we couldn’t post your outside link on our blog since we ourselves are also a brand. We recommend http://www.hennasooq.com
Please read the blog article as it goes through all the steps to do henna for your eyebrows. It works perfectly and is very easy to do. Yes it’s very similar to doing the hair on your head as well.