
Henna and Organic Cassia Obovata are both fantastic for the hair, but did you know that these powders benefit the nails as well? Henna-ing/Cassia-ing fingernails strengthens and protects them. Applying Henna or Organic Cassia Obovata to the nails is a little different than applying henna to hair and skin. Henna your fingernails with caution as the stain is permanent as it takes approximately 4-6 months for the nail to fully grow out.
The following are instructions on how to henna/cassia your nails perfectly!
What Will You Need?
- 10 2″x2″ (1 x 1 inch) squares of plastic kitchen wrap
- 10 2″x2″ (1 x 1 inch) squares of aluminum foil (to help hold the kitchen wrap)
- OR Hypafix tape to wrap nails, cut into small squares (1 x 1 inch) to fit nails (Khadija’s preferred method)
- 10 pieces of sticky-tape if wrapping with plastic wrap, and aluminum foil
- a small bowl or container to mix the paste in
- Oil of choice
- Essential oils (for henna terping)
- A pinch of Organic Aloe Vera Powder (optional)
- 1-2 TBS Henna Powder or Organic Cassia Obovata
- Something to apply the paste to your nails: Ice cream/paddle pop stick, orange stick; anything you don’t mind getting dyed. Jacquard Applicator Bottles and Hand Rolled Cones are also suitable for applying paste to your nails. (Hand rolled cones are Khadija’s preferred applicator)
- Witch hazel/alcohol wipes/dish soap to prepare the nail
- Newspaper to catch drips
- Equal parts fructose and lemon dissolved on low heat. This will be used to ‘seal’ the henna paste. Melted shea butter or hairspray can also be used to seal the henna paste
- Shea butter or cocoa butter applied around the nail to protect the skin (not necessary)
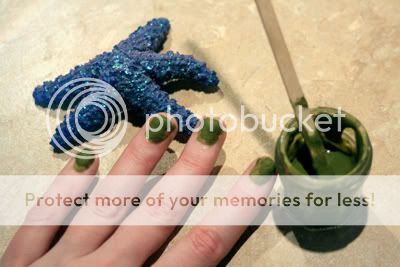
Step 1(a). Prepare Henna Paste:
Mix 1-2 TBS of your choice of Henna Powder with a pinch of Organic Aloe Vera Powder into a thick paste (not quite clay-like consistency, but thicker than henna for hair) with water. Add a couple of drops of lemon juice, a sprinkling of sugar and 1-2 drops of either Tea Tree, Cajeput, Lavender, Ravensara or Geranium Bourbon essential oils. These are ‘terps’ that will help extract and release the dye from the henna, which will create a darker staining paste. Tea Tree and Lavender are especially useful for healing the nails. Allow the henna to have time for dye release (use dye release times for body art, and not hair).
For a warmer toned colour, use Fresh Jamila Powder, but keep in mind, the Jamila will build up to a cooler burgundy tone with repeated applications. For cooler tones right off the bat, use Fresh Yemeni Henna Powder, Red Raj or Fresh Moroccan Powder. For super dark stains, try Henna Sooq’s Premium Blend. The first time one hennas their nails, it may turn out pumpkin orange if a terp isn’t used, or if the paste isn’t left on for long enough! Great if you’re looking for pumpkin orange. As with hair, repeated applications of henna on the nails can deepen the colour.
Step 1(a). Prepare Cassia Paste
Cassia paste is a little easier, and different to prepare than nail henna. To prepare Organic Cassia Obovata for nails, mix about 2 TBS of Organic Cassia Obovata with a little distilled water and a few drops of your favourite oil (Organic Golden Jojoba Oil, coconut oil, olive oil, hempseed oil, etc) and a couple of drops of lemon juice until the paste is the consistency of toothpaste. The Cassia paste does not need to dye release. It is important that distilled water is used to prevent yellowing of the nail due to dye release. Apply the paste to the nail after 5 minutes of rest.
Step 2. Prepare Your Tools And Nails
Cut out the 10 squares from the kitchen wrap and foil, and cut 10 pieces of tape 2″ in length. Place everything within reach, so that once the henna is on your nails, there won’t be any rushing and excess mess. Clean nails with witch hazel or dish soap to remove any dirt from the nail surface. Please avoid soaps as they can leave a film on the nails which can lead to splotchy results. Mix any additives into your Henna and Cassia paste. To protect your fingers, apply shea butter or cocoa butter carefully around the nail bed with a Q-Tip to ensure that henna bleed does not stain them. This step is optional as the henna will fade from the skin eventually.
To prepare the sugar and lemon syrup henna sealant, heat equal amounts of sugar and lemon juice on the stove (or microwave) until all the sugar dissolves and the liquid becomes slightly thicker. Melted shea butter or hairspray can also be used instead of the sugar sealant.
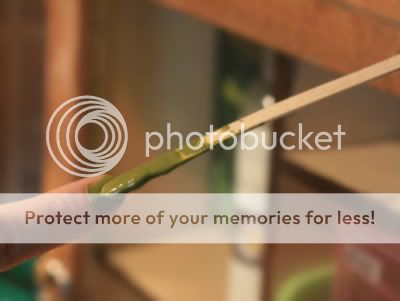
Step 3. Apply Henna/Cassia Paste
Use a small paintbrush, q-tip, ice cream stick, Rolled Cone or Jacquard Bottle to apply the henna to the nail. Make sure to apply the henna thickly to ensure even staining. Henna each nail on your non-dominant hand and let the top of the henna become touch dry. Remove the Cassia pate after 20 minutes. Cassia-ing nails does not require covering or sealant.
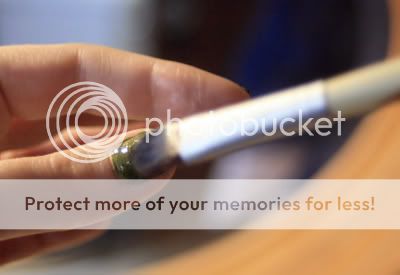
Step 4: Applying Sealant
Gently brush on your choice of sealant and allow it to dry on the nail. Melted Shea butter to be the easiest to apply with a small brush after the henna paste is touch-dry on the nail.
Step 5: Covering The Nails
Once nails are dry, take a square of kitchen wrap and cover each nail. Cover each plastic wrapped finger with aluminum foil and tape the bottom of the foil and plastic wrap with a little tape. OR you can apply the hypafix in small squares over your finger or toe nails instead of plastic wrap, and aluminum. Cotton gloves are great to further protect the nails overnight, and are optional.
Repeat steps 3 and 4 on the other hand. Only leave the henna paste on the fingernails overnight for a rich colour.

Step 6: Removing The Paste
To remove the henna paste from the nails, gently scrape the henna off and wipe with a damp-dry paper towel. It is important that the nails remain dry for the next 3 days to allow the colour to deepen, and oxidize. Apply a protectant such as Sweet Mimosa Butter or Aftercare Henna Balm to your nails to protect them before and after showering. The henna on nails will take up to 48 hours to oxidize and reach full color stain.

Quick Nail Henna Method:
Apply henna paste thickly to the finger or toe nails and allow to dry. Hold fingernails above steaming water for 5 minutes at a time for a total of 30 minutes to keep the henna moist and to create a rich stain. Wipe henna off nails and repeat if a deeper colour is desired.
Henndigo or two step henna and indigo:
It is not recommended to use Indigo on the nails due to the unpredicable results.
TIP: The Beginner Henna Body Art Kit is a perfect kit for hennaing your fingernails!
If you like the colour your nails are after the first hennaing and do not wish for the colour to go darker, let the nail grow out a little until there is a little white strip at the bottom of the nail. Use a Jacquard bottle with a fine tip to cover the regrowth, seal, cover and leave overnight. Make sure that the new henna doesn’t overlap the old henna to prevent darkening at the overlap.


I want to see after pictures!
This looks awesome I will definitely try this! Thanks for posting.
Bri yes they’re coming absolutely! We are working on it and will update this once we get the new photos of the freshly henna’ed nails
OOooh!! Tempted to try this! When you say it’s important that the nails remain dry, do mean not letting them soak (like doing the dishes) or not even letting them get wet (like washing your hands)?
Lyz, don’t really let them soak and try really not to get them very wet until at least 24-48 hours after the application and just keep them moisturized so they oxidize nicely and as dark as possible. Soaking for sure don’t but getting wet is a bit hard to avoid since you have to wash your hands but try your best. 🙂
Hi Khadija, I am learning so much from you about henna and Ayurvedic therapy, thank you so much. I am very interested to know whether ot not cassia formula stains the nail and if so what color. Does cassia make nails strong and how often do I apply before I see the benefits?
My nails peel constantly and I have hangnails no matter that I misturize my hands night and day and I rarely cut my cutilces..I push back instead.
Thanks for your help.
I used to Henna my nails when I was travelling in Central America. Its a nice change from contemporary nail polish and lasts so much longer without maintenance. Love Henna!!
Does it make your nails stronger? How long does it take before your nails would get stronger? Where did you get it, and how often should I apply?
HI Debbie. Yes it absolutely does make your nails much stronger and healthier. We purchase our henna and mix it into a paste for nail use at http://www.HennaSooq.com. This is Henna Sooq’s blog as well.
Usually you’ll need to reapply as it grows out every 4 weeks.
I want to try this someday soon! Does it matter what type of henna I use? I have Jamila and Red Raj. Which one should I use?
can you use this henna on nails when pregnant?
Yes you can use henna during pregnancy.
is it like clean nails apply cassia paste..scrap it off and then apply henna paste…expose to steam???please comment steps in brief as reply
You can use either cassia or henna if you’d prefer. Steam can help warm them up and get darker.
Hi, I was wondering which of your hennas was used to achieve the stunning results in the last picture. I’ve never seen such RED hennaed fingernails. I’ve managed to get that color on my toenails only.
Hello Karam. We usually recommend and I personally use Red Raj on my nails. I cover them with hypafix and leave overnight. I hope this helps 🙂
Thanks. Khadija! That’s the next henna I’ll buy, then.
Welcome Karam. 🙂
Can you put henna on the white of your fingertips? And get a color other than yellow or brown? If you leave it for long and let it oxidize for 24 hrs?
Sure you could do that. It would come out more so burgundy with our supreme blend which I personally love!
Hello Siti. No as cassia doesn’t produce red or orange tones. It only has a low yellow dye molecule.
Yes absolutely. It does for me all the time. Just make sure to wrap it too and take extra care of it for best results.